martes, 10 de septiembre de 2019

How to Repair Excel File Can't find project or Library Error


For different situations some solutions to rectify the problem or to repair corrupted Excel file are always there. Like finding out the missing library or the cause of mismatch if it exists. The library is then added or alternatively the code may be rechecked to link to the appropriate library.
Step 1. Open the MS Excel file, giving an error message.
Step 2. Ensure that the sheet that has defined functions or buttons is selected.
Step 3. Press “ALT and F11 keys”, for VB Editor in a new window (as below).

Step 4. Click on Tools menu and then select References from pulled down menu, as shown


Step 5. Following dialog box will display ‘Missing object library or type’ is indicated, as shown below

Step 6. As in above display if check mark exists with missing library, uncheck it and click OK
Step 7. Exit and save the original Excel file.
Now check to ensure respective functions are working properly.


viernes, 6 de septiembre de 2019

Automate Task with Folder Actions


Turn on Folder Actions globally


To use Folder Actions, you must first turn this feature on globally. To do this, right-click or Control-click on any folder and choose Services -> Folder Actions Setup. (If you only have a few Services, you may not have a Services menu and will instead see the Folder Actions Setup menu item at the bottom of the contextual menu.) When you choose Folder Actions Setup, a small window opens showing a list of AppleScripts. Select Enable Folder Actions in the window and then quit (Command-Q).

Get alerted to incoming files


Now, let’s apply a simple, useful folder action to one of your folders. If you share files with others over a network, your colleagues may deposit files in your Mac's built-in Drop Box folder. But how do you know when a new document has arrived? Add a Folder Action that displays a dialog box whenever a new file is added to this folder.
To do this, first go to your Public folder. You’ll find it inside your home folder—the one with the house icon. (Or, in the Finder select Go -> Go To Folder and type ~/Public/). Right-click or Control-click on the Drop Box folder inside, choose Folder Actions Setup, click on “add - new item alert.scpt,” and then click on Attach.


Let’s try this out. Take any file and place it inside this folder. Within a few seconds you should see a dialog box telling you how many new items were added to the folder. This dialog asks if you would like to view these items. Click on Yes to open a window showing the files, or click on No to dismiss the dialog box. You may not need to see the files right away, but now you know that they have been added.


Once you attach the Folder Action to your Drop Box folder, you'll see an alert like this every time someone puts something in the folder.


Another way to use this same script is with your Dropbox folder. If you share files using Dropbox’s shared folders, you may want to know when you receive new files. Dropbox offers “desktop notifications”—floating alerts—but they fade away after a few seconds. Attach the same script we used above to a shared folder and you’ll see an alert whenever Dropbox downloads new files to that folder. Note that this only works when an item is added to the folder itself, not when someone adds an item to one of its sub-folders. If you have a lot of sub-folders in your shared folder, you can apply the same script to each of them to get alerts for all of the folders.

Explore OS X’s other built-in actions


OS X includes a handful of folder action scripts in the /Library/Scripts/Folder Action Scripts folder. Let’s look at a couple of them and see how they can save you time.

In this folder, you’ll see a number of scripts that can act on graphics. For example, there are three scripts that can automatically convert image files to JPEG, PNG or TIFF format. Let’s say you have a blog, and you want all your graphics to be in JPEG format. Create a folder somewhere and attach the “image - Duplicate as JPEG.scpt” script to it. Every time you add an image file to that folder, it will be immediately converted.

There’s a nifty script if you often open a lot of folders within a specific folder. As you know, closing all those windows can be annoying. If you attach the “close - close sub-folders.scpt” script to a folder, any sub-folders that are open will be closed when you close the top-level folder. This is useful if you have projects that require you to access files in a lot of sub-folders.

Turn off Folder Actions


If you ever want to turn off Folder Actions for specific folders, you can access the Folder Actions Setup applet as described above by clicking on any folder. Dismiss the list of scripts, and you’ll see a list of those folders for which you’ve set Folder Actions, and which scripts you’ve attached to them. Turn off any of these by unchecking them, or delete any folder or script by selecting it and clicking on the minus button.


In this window, you can see all folders that have Folder Actions attached to them, and which scripts they are set to run.


source: www.macworld.com

jueves, 5 de septiembre de 2019

Skype Meeting control is not displayed on Outlook 2016


  1. Start Outlook.
  2. On the File menu, click Options.
  3. In the navigation pane, click Add-Ins.
  4. On the Manage menu, select COM Add-Ins, and then click Go.
  5. In the COM Add-Ins dialog box, select the Skype Meeting Add-in for Microsoft Office 2016 option, and then click OK.

If you do not see the Skype Meeting Add-in for Microsoft Office 2016 entry in the COM Add-Ins dialog box, click here for the resolution. The entry should be displayed as it is in the following screen shot:


More Information:

Registry Key to enable or disable Skype Meeting Add-in

When you manually enable or disable the Skype Meeting Add-in for Microsoft Office 2016 add-in by using the COM Add-Ins dialog box (by using the steps in the "Resolution" section), the following registry data is updated:

Key: HKEY_CURRENT_USER\Software\Microsoft\Office\Outlook\Addins\UcAddin.LyncAddin.1
DWORD: LoadBehavior
Value: 3 = add-in is enabled, 2 = add-in is not enabled

"Skype Meeting Add-in for Microsoft Office 2016" entry is missing in COM Add-Ins

If you do not see the "Skype Meeting Add-in for Microsoft Office 2016" entry in the COM Add-Ins dialog box in Outlook, the add-in may not be correctly configured in the HKEY_LOCAL_MACHINE hive of the registry. In this situation, follow these steps.

Important Follow the steps in this section carefully. Serious problems might occur if you modify the registry incorrectly. Before you modify it, back up the registry for restoration in case problems occur.

To resolve this issue, examine the applicable registry subkey for the Skype Meeting Add-in for your installation of Microsoft Office 2016.

Note These steps apply to both the 32-bit Windows client with Office 32-bit (Click-to-Run installation) and the 64-bit Windows client with Office 64-bit (Click-to-Run installation)

  1. Click Start, type regedit in the Start Search box, and then click OK.
  2. In Registry Editor, locate one of following subkeys, as applicable to your installation of Microsoft Office:
     
    • For 32-bit Windows client with Office 32-bit (Click-to-Run installation) or 64-bit Windows client with Office 64-bit (Click-to-Run installation):

      HKEY_LOCAL_MACHINE\SOFTWARE\Microsoft\Office\ClickToRun\Registry\Machine\Software\Microsoft\Office\Outlook\Addins\UcAddin.LyncAddin.1
    • For 64-bit Windows client with Office 32-bit (Click-to-Run installation):

      HKEY_LOCAL_MACHINE\SOFTWARE\Microsoft\Office\ClickToRun\Registry\Machine\Software\Wow6432Node\Microsoft\Office\Outlook\Addins\UcAddin.LyncAddin.1
    • For 32-bit Windows client with Office 32-bit (MSI installation) or 64-bit Windows client with Office 64-bit (MSI installation):

      HKEY_LOCAL_MACHINE\SOFTWARE\Microsoft\Office\Outlook\Addins\UcAddin.LyncAddin.1
    • For 64-bit Windows client with Office 32-bit (MSI installation):

      HKEY_LOCAL_MACHINE\SOFTWARE\Wow6432Node\Microsoft\Office\Outlook\Addins\UcAddin.LyncAddin.1
  3. In the details pane, double-click LoadBehavior. If the value in the Value data box is not 3, change it to 3, and then click OK.

How To Add Additional Mailbox To Outlook 2016


1. To add another mailbox, launch Microsoft Outlook 2016 then click the File tab > click Info tab > Account Settings.

2. In Account Settings, select your current Mailbox and click Change.

3. On the next screen select More Settings.

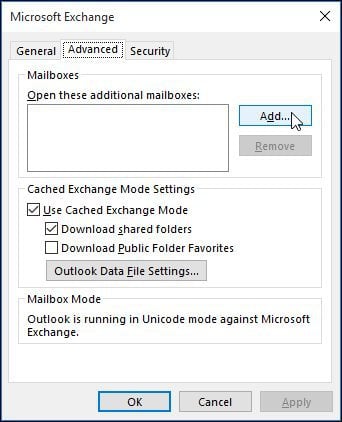
4. Select the Advanced tab and click the Add button.
Setup 4
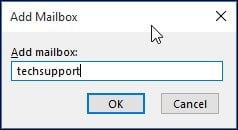
5. Type in the name of the mailbox then Click OK.
Setup 5
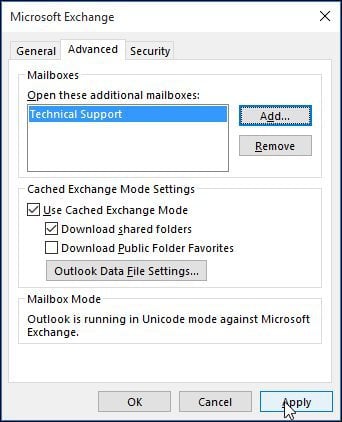
6. Once the name of your mailbox is created, click Add and Apply.
Setup 6
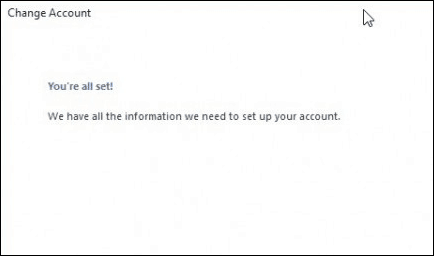
7. Finish out the wizard by clicking Next, and then Finish on the Change Account screen.
Finished
8. Close out of the Account Settings screen, and then select your new mailbox in the mail pane to populate it with your messages.


Troubleshooting:
If you are unable to add a mailbox, these could be some reasons:
  • The administrator might not have permitted access. If so, contact them for further instructions and assistance.
  • You entered an incorrect name for the mailbox; again, contact your administrator.
  • The password has expired. If you have access to Outlook Web Access, try signing in and update your password then try signing in again.
  • If you are an Office 365 user, make sure a license is assigned to your account to access the mail server.