viernes, 8 de marzo de 2019

Creating Batch File to Map Network Drive


If you want to save time by creating a batch file that when you click on it it will automatically map the drive for you.  Or if the map network drive keep disconnecting every time you restart your computer, then you can put the batch file in the start up folder so that it run every log in.

  1. Open Notepad
  2. net use S: \\Network path /persistent:yes (The Network path is the path where you want to mapped to)
  3. If you want to mapped multiple drive just keep repeating step 2 and 3
  4. You can add "pause" word at the end of the file to see the results of the batch file
  5. Click File and select Save As
  6. Navigate to where you want to save it
  7. Name it and make sure at the end of the name you add .bat as extension file.
  8. Click OK
  9. Now navigate to where you save it and click on it
  10. A command prompt should appear
  11. Then Press any key to exit

I'm always add the line: net use S: /DELETE /YES to delete any network parth linked to the letter. (In this case S:)

It should looks something like this:

net use S: /DELETE /YES
net use S: "\\server_name\folder_name" /PERSISTENT:YES
net use R: /DELETE /YES
net use R: "\\server_name\folder_name" /PERSISTENT:YES
net use T: /DELETE /YES
net use T: "\\server_name\folder_name" /PERSISTENT:YES

Example:


(servers name have been removed)

viernes, 1 de marzo de 2019

How can I install a font from a batch file?

When you install a font all it does is copy the .ttf file to 
%systemroot%\fonts 
and add an entry in 
HKEY_LOCAL_MACHINE\SOFTWARE\Microsoft\Windows NT\CurrentVersion\Fonts
This can be automated with a batch file as follows:
install.bat:
xcopy font_name.ttf %systemroot%\fonts
regedit /s font.reg
If you want to install with administrator's rights:
runas /user:domain\userID "xcopy CHL_AVON_CG.ttf %systemroot%\fonts"
regedit /s font.reg
font.reg:
Windows Registry Editor Version 5.00
[HKEY_LOCAL_MACHINE\SOFTWARE\Microsoft\Windows NT\CurrentVersion\Fonts\]
"CoalhandLuke_Avon_CG (TrueType)"="CHL_AVON_CG.ttf"

martes, 22 de mayo de 2018

Orange Pi Zero: Installing Armbian

The Orange Pi Zero needs an operating system to boot. We’ll use Armbian, which has operating system images for many of the Orange Pi models, including the Zero.
1.- Download the image for the Orange Pi Zero from the Armbian website. I've selected the Armbian Xenial image for servers or light desktops. Within a few seconds the download should begin.  


2.- When the download is complete, browse to your downloads folder and locate the file. It should be named something like Armbian_5.38_Orangepizero_Ubuntu_xenial_next_4.14.14.7z. Right click on the file, select 7-Zip from the context menu and choose Extract Here. The archive should expand, resulting in several files including one with a .img extension similar to Armbian_5.38_Orangepizero_Ubuntu_xenial_next_4.14.14.img

3.- Insert your blank micro SD card into your computer. Take note of the drive letter it is assigned.

4.- We need Win32DiskImager aplication to write image into SD card. You can use other programs as Rufus. Open Win32DiskImager by selecting it from the Start menu.

5.- Click the folder icon below the Image File label to browse to and select the Armbian img file (e.g. Armbian_5.38_Orangepizero_Ubuntu_xenial_next_4.14.14.img). 

6.- Under the Device label, select the drive letter of your micro SD card. In my case [G:\]. Again, make sure you are 100% certain you’ve selected the correct drive, otherwise you risk overwriting the data on another drive.

 
7.- Click the Write button to start writing the Armbian image to the micro SD card.

8.- When the writing process is complete, click the Exit button to quit Win32DiskImager.


9.- Use the Safely Remove Hardware and Eject Media option in the system tray to eject your micro SD card. 

10.- Physically remove the micro SD card from your computer.

Next post: Booting your Orange Pi Zero.

lunes, 21 de mayo de 2018

Orange Pi Zero Developer Kit Unboxing and Assembly


Time ago, I bought orange pi zero developer kit.


The package includes two Orange Pi packages, a plastic case and a bag with screws and rubber pads.

The first package comes with Orange Pi Zero board powered by Allwinner H2+ quad core processor with 512 MB RAM, micro USB for power, 10/100M Ethernet, a USB port, a WiFi antenna, and expansion headers on the top and a micro SD card slot on the bottom.

The second package is for Orange Pi Zero Interface board v1.1 with two more USB port, an IR receiver, a 3.5mm audio jack, and a built-in microphone.


The next step is just to plug the interface board into Orange Pi Zero board, bending the WiFi antenna between the two boards. (I've done a little hole on the plastic case to take out the WiFi antenna).
Then, tighten the cover with the 4 screws, and adding the 4 rubber pads. 


Next tutorial: Step-by-step instructions to get a working Armbian Linux environment on the Orange Pi Zero.


Hardware specification
CPU
H2 Quad-core Cortex-A7 H.265/HEVC 1080P
GPU
·Mali400MP2 GPU @600MHz
·Supports OpenGL ES 2.0     
Memory (SDRAM)
512MB DDR3
Onboard Storage
100M / 10M Ethernet RJ45 (POE is default off)
Wifi Antenne
XR819, IEEE 802.11 b/g/n
Audio Input
MIC
Video Outputs
Support external board via 13pins
Power Source
USB OTG can supply power
USB 2.0 Ports
One USB 2.0 HOST, one USB 2.0 OTG
Buttons
Power Button
Low-level peripherals
26 Pins Header, compatible with Raspberry Pi B+  
13 Pins Header, with 2 x USB, IR pin, AUDIO (MIC, AV)
GPIO(1x3) pin
UART,ground.
LED
Power led & Status led
Supported OS
Android, Lubuntu, Debian, Rasberry Pi Image
Interface definition
Product size
46mm × 48mm
Weight
26g
Power supply
5V 3A
Operating Temperature
-10 ~ 65℃

martes, 23 de enero de 2018

Windows Autologon


* Windows registry:


  1. Launch Regedit 
  2. Navigate to:
    HKLM\Software\Microsoft\Windows NT\CurrentVersion\winlogon
    Set: AutoAdminLogon = 1 (one means on, zero means off.)
  3. DefaultUserName. The value should reflect the user who you wish to logon automatically.  If this value does not exist, then right-click in the right pane, New, REG_SZ, name it, DefaultUserName.  Set the string value to the required UserName
  4. DefaultPassword. The password of the previous user (If this value does not exist, then right-click in the right pane, New, REG_SZ, name it, DefaultUserPassword).
  5. Finally, if it's a domain user, create a String Value called DefaultDomainName.  
    Set: DefaultDomainName = "OnlyYouKnowDomain"

* External application:


This application do the same as "windows registry mode" but in a pretty view.


  1. Enter user name.
  2. Write user's password.
  3. Enter the domain
  4. Click on "Enable"
  5. Reboot the machine and check autologon.

miércoles, 17 de enero de 2018

Adding a Network Location in Windows


Adding a network place in Windows allows you to access FTP, Windows file shares, and some HTTP servers (with FrontPage extensions loaded) directly in My Network Places, without having to use an FTP client. Though this article uses Windows 10, the instructions are similar for 7 and 8. 
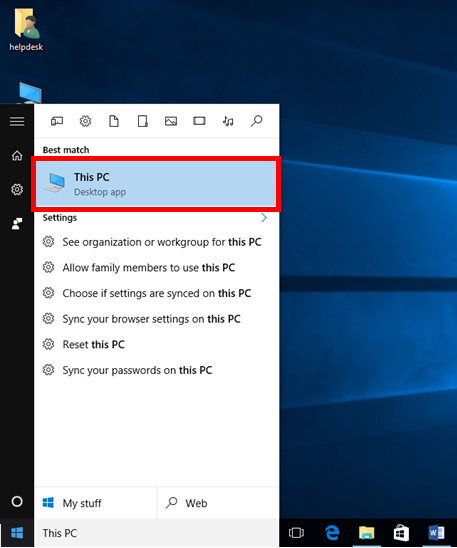
1. Open the Start menu, then search and click "This PC." 
  •  In Windows 7, search and click "Computer." 

2. A Windows Explorer window will open. Right-click on "This PC" (or "Computer" in Windows 7) and select "Add Network Location." 


3. Click "Next" on the wizard that opens. 


4. Select "Choose a custom network location" and click "Next." 


5. Type in the address, FTP site, or network location, then select "Next." 


6. Type a name for the network and select "Next." 


7. Click "Finish" on the wizard.


8. If a login screen appears, type in your ID and Password, then click "Log in."


9. The location will now be listed under "Network Locations" in "This PC."
   

jueves, 28 de diciembre de 2017

Solution: "The terminal server has exceeded the maximum number of allowed connections"

Have you ever seen this error message when trying to remote desktop into your Windows Server?
“The terminal server has exceeded the maximum number of allowed connections. The system can not log you on. The system has reached its licensed logon limit. Please try again later.”
I have seen it a million times. What it means is that you have used up your two remote administration remote desktop connections. Each copy of Windows Server 2003 comes with 2 licenses to be logged in simultaneously for administration purposes. So how do you log someone out if  you can not log in? Do I really have to walk over to the server room?  The answer is no and chances are those logged in users are just connections that have timed out or have been aborted. Always remember to log out when you are finished with your remote desktop connection.
If you are working in a domain enviroment you can just connect to another server that is in the same domain and open up your MMC console. We want to launch the Terminal Server Manager.
Once you launch the Terminal Server Manager we need to go to the file menu and connect to another server. Choose your server from the list of available terminal servers or type in your servers name. Then you will be able to right-click on the connection in question and log them off.
If you are not luck enough to be in a domain then we need some Admin magic. You will need to be logged in with an account that has administrative access to the machine in question. A domain administrator is your best bet if you are not sure about security. Then you will have to drop to a command line ( Start / Run / CMD ). If you are not logged on as a domain administrator or an administrator of the server in question you can create a short cut to the command prompt and then choose who it runs as by right clicking on the shortcut, choosing properties and then selecting the domain administrator as the user who you want to run the shortcut as.
Once you have to command prompt open we will need to run this command:
query session /server:servername
If you do not have the command query installed you can either copy it over from one of your server, run the command from that server or install Microsoft’s Server Tools on your machine.
After running the command you will see all the logged in sessions and their session ID’s. This is the number that we will need to kill the session. The remote sessions will say RDP in the left column. The line that says console is the session logged on at the physical console.
The command you will need to run to kill the session is:
reset session [ID] /server:servername
Just replace [ID] with the id from the last step and hit enter. There are NO BRACKETS around the ID. That’s it you will now be able to log in to your server remotely.
One final option that only works sometimes is using this command from the machine you are connecting from:
mstsc /v:servername /console
That will allow you to grab the console session. You will need the username and password that was used to log into this session.